Create a mind map with AI in minutes. A teacher's guide to two methods, choosing visual or text, and making a map you can project, print, or share.
A mind map is quick to picture and slow to make. You can already see the one you want for tomorrow's lesson: the central idea in the middle, a few branches coming off it, and room for students to add their own. Then you open a blank slide or a sheet of paper, and twenty minutes later you are still dragging boxes around and trying to keep the branches even. Building it by hand is the slow part, and it is the part AI can take off your plate.
Here's how to create a mind map with AI: hand that part over, and keep the part that still needs a teacher.
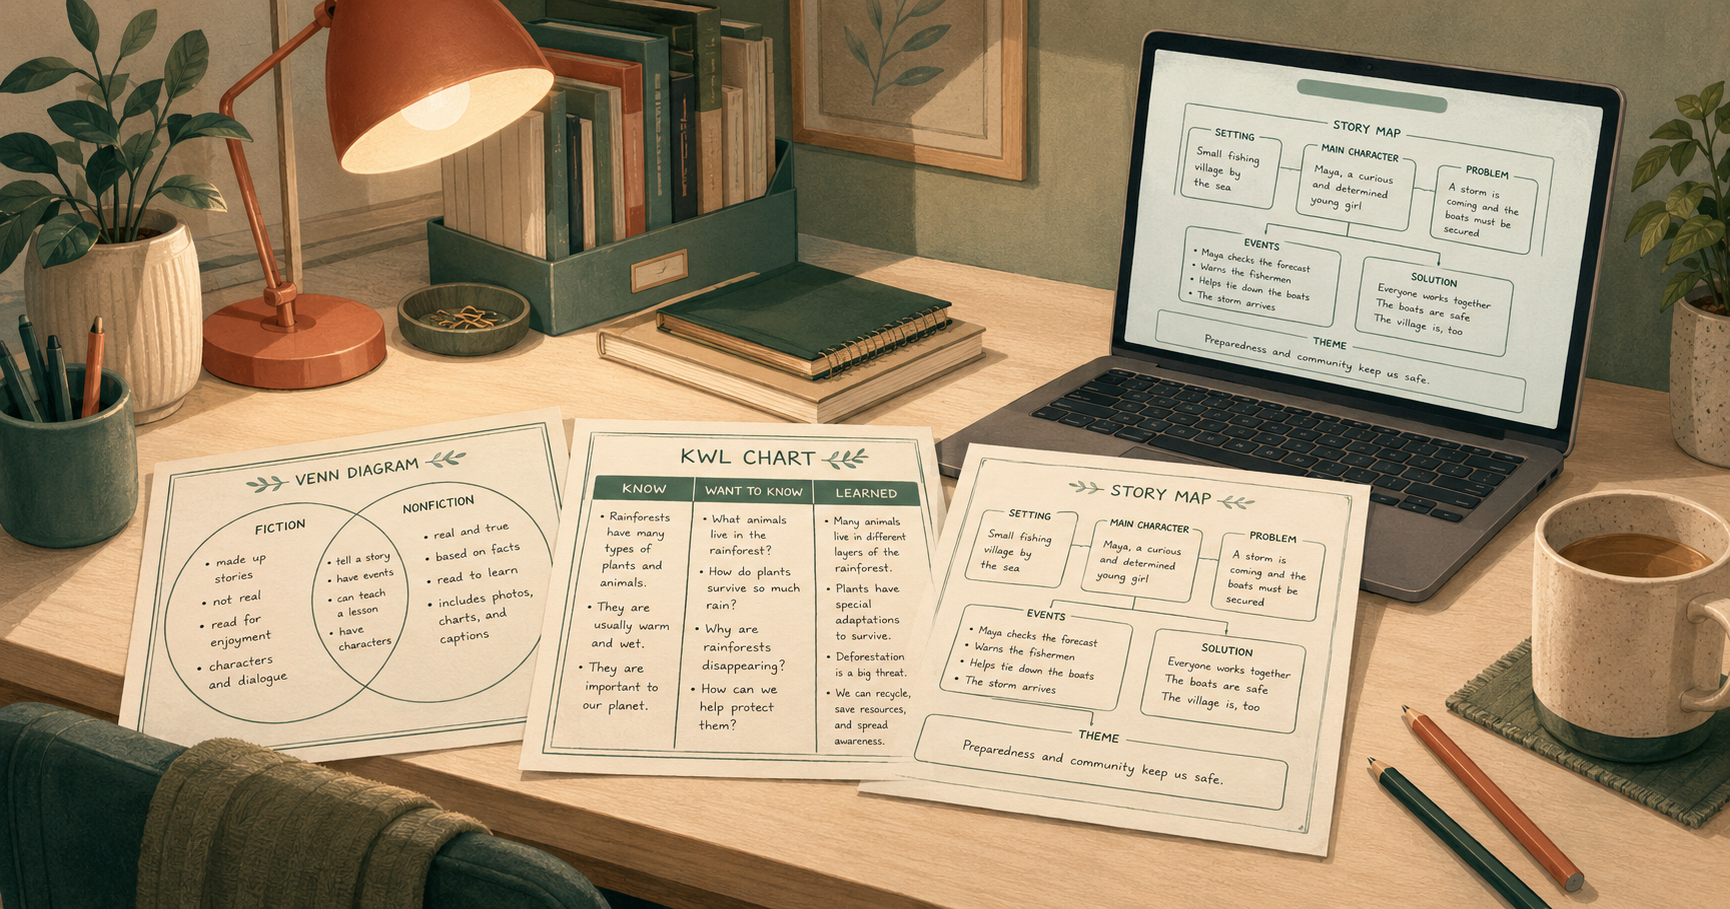
A mind map isn't one thing. Before you make one, it helps to decide what you need it to do, because the map you project while introducing photosynthesis to a Grade 7 class is not the map you print and hand out for revision week. Same topic, different job. Skip that decision and you can end up with a map that looks fine but never gets used.
So before you generate anything, settle two questions.
First, what's the map's job? Most classroom mind maps do one of three things:
Each job calls for a slightly different map. A map you project can use color and a few keywords, since you are the one doing the talking. A map you hand out needs to make sense on its own, in black and white.
Second, is a mind map even the right format? Teachers often use "mind map" and "graphic organizer" to mean the same thing, but they are not quite the same. A mind map is free-form: one central idea, with branches coming off it. A concept map, a Frayer model, or a Venn diagram has a set structure built for a particular job, like defining a term or comparing two things. So if what you need is to compare the causes of two wars, a structured organizer will fit better than a free-form map. Monsha's Graphic Organizers tool covers those layouts.
Fair warning on either one: the quickest way to ruin a map is to cram too much into it. Keep each node to a keyword or two, not a full sentence. A map crammed with text is hard to read, and a map students can't read won't help them much.
Once you have those two answers, you are ready to build, and building is the part you can hand to the tool.
This is the fast way to make one. Open Monsha's Mind Map tool and you can go from a topic, or from your own lesson material, to a finished map in five short steps. Each step picks up a decision you already made in the last section, so you are not starting from a blank page.
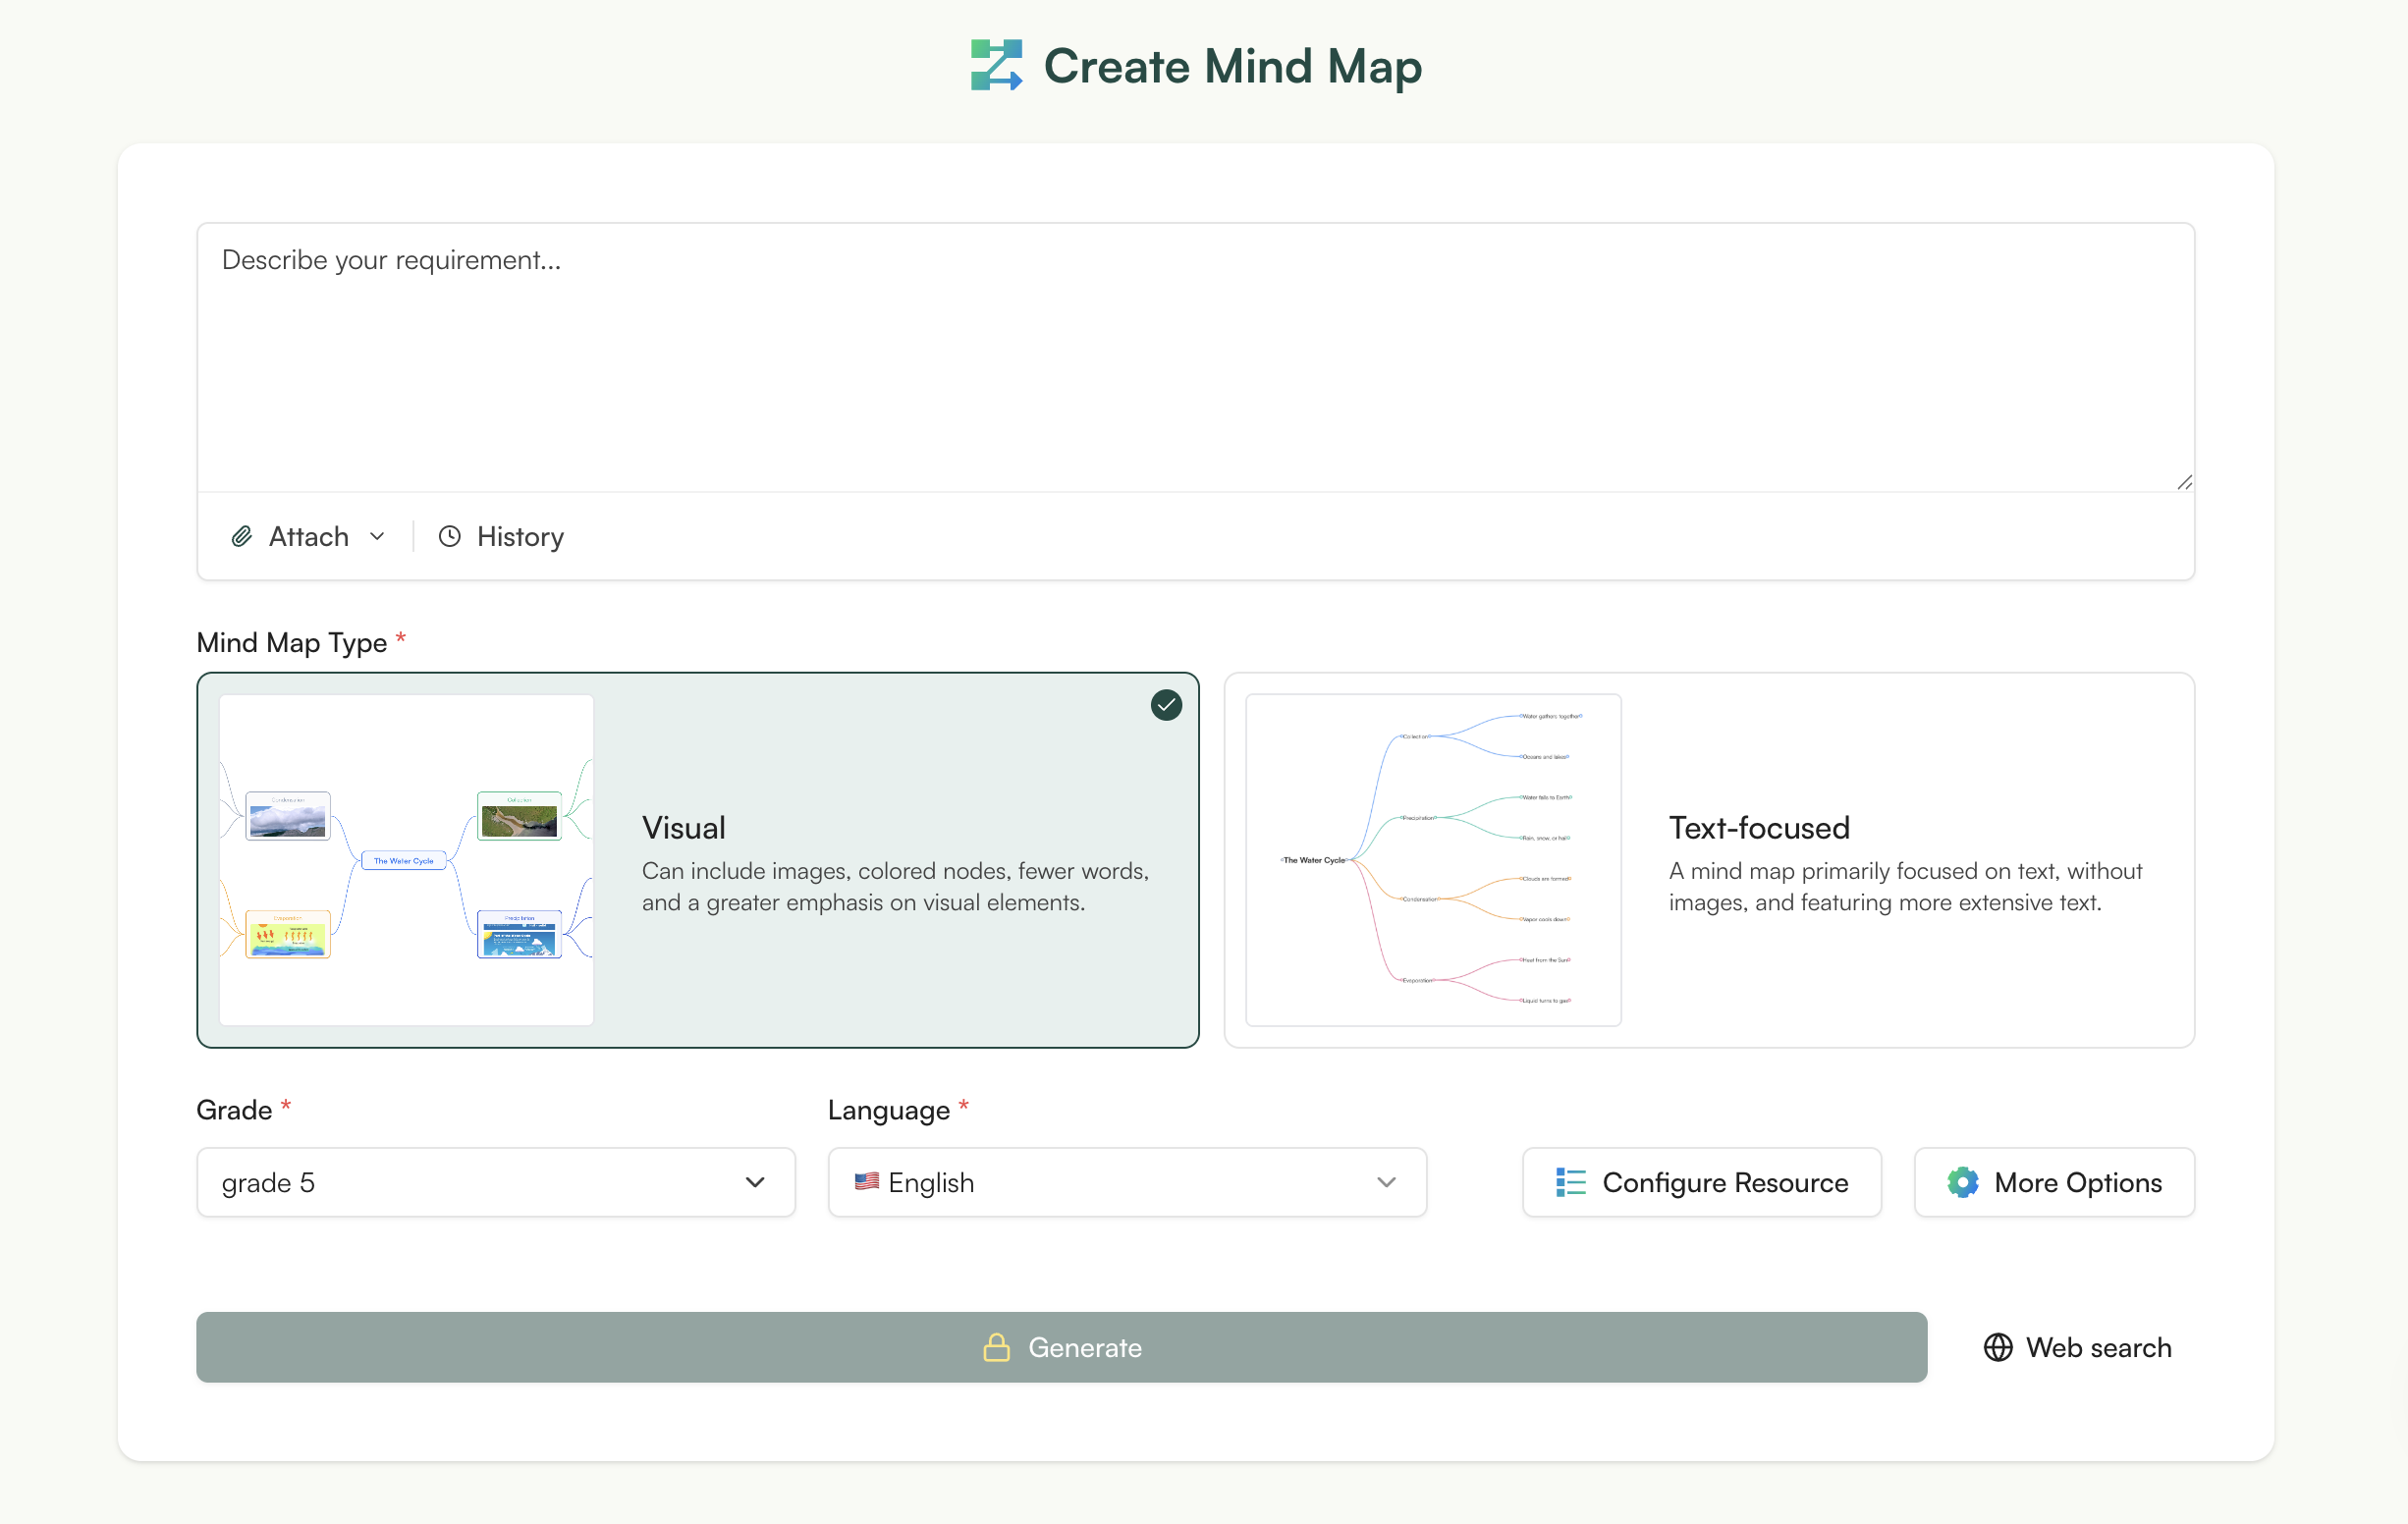
The first box is Describe your requirement. Type what you would tell a colleague who asked what the map is for: the topic, the grade, and the job. Something like:
Photosynthesis: introduce the topic to a Grade 7 science class as a teaching aid.
If you would rather build from your own material than from a topic line, click Attach. You can pull from a website link, an uploaded file or PDF, a pasted text excerpt, or a YouTube video, so a chapter, a passage, a poem, or a clip you already teach from can become the source.
If you build from video a lot, here is a related walkthrough on turning YouTube clips into worksheets. The History button brings back prompts you have used before.
This is the type decision from the last section, now a button. There are two cards:
If you are not sure, go back to the job. Projecting it points to Visual; handing it out points to Text-focused.
Quick one. Grade and Language are both required, and they auto-fill from whatever you used last, so most days this is a glance rather than a step. Still worth a look, since the grade is part of what keeps the connections at the right level for your students.
Configure Resource opens a short modal with two settings that do a lot of the work. Purpose (Teaching aid, Student study guide, Pre-writing brainstorm, Chapter / reading summary, Project planning) tells the tool what kind of map to build, so a study guide leans on definitions and recall cues while a brainstorm stays loose and open. Depth sets how far down it goes: Overview is 2 levels, Standard is 3, and Detailed is 4 or more. There is a free-text box for anything else, and under More Options you can attach the map to a lesson, assign standards, or adapt it to a framework.
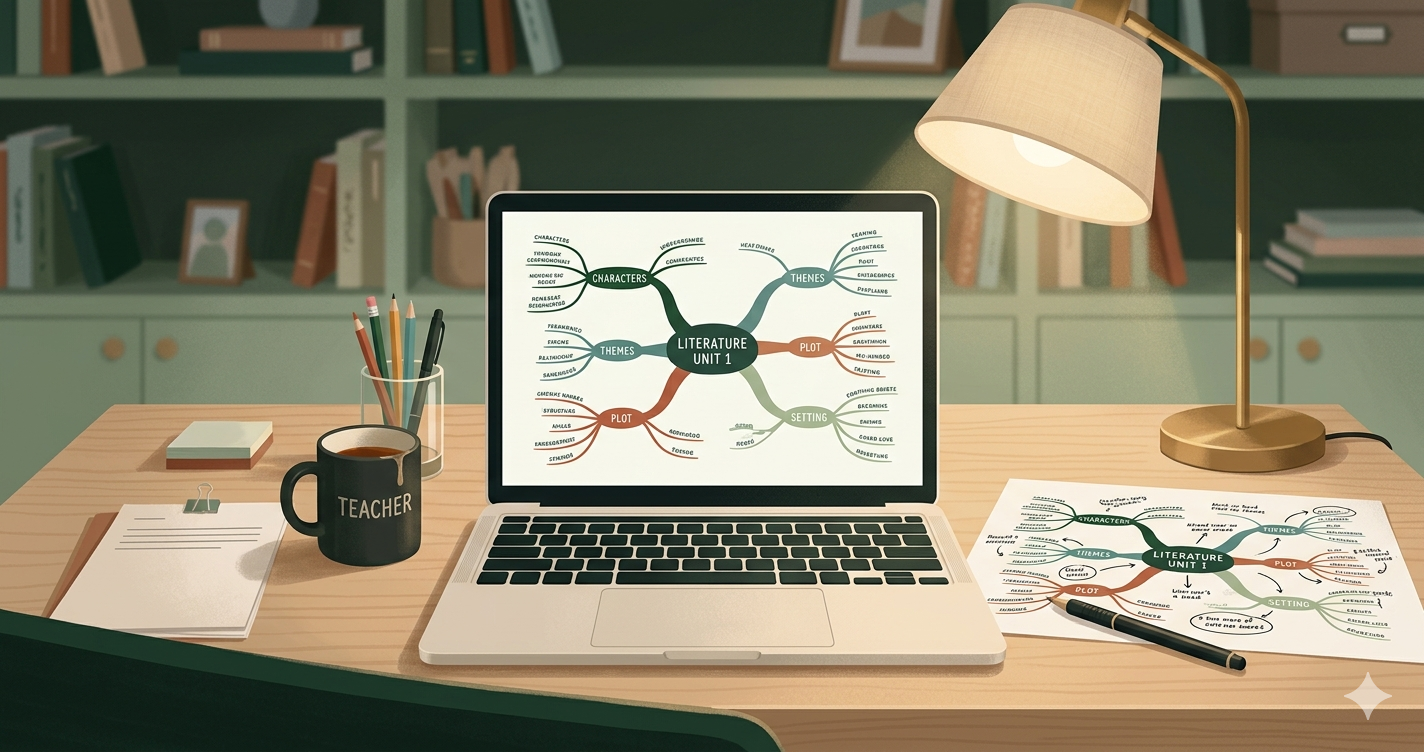
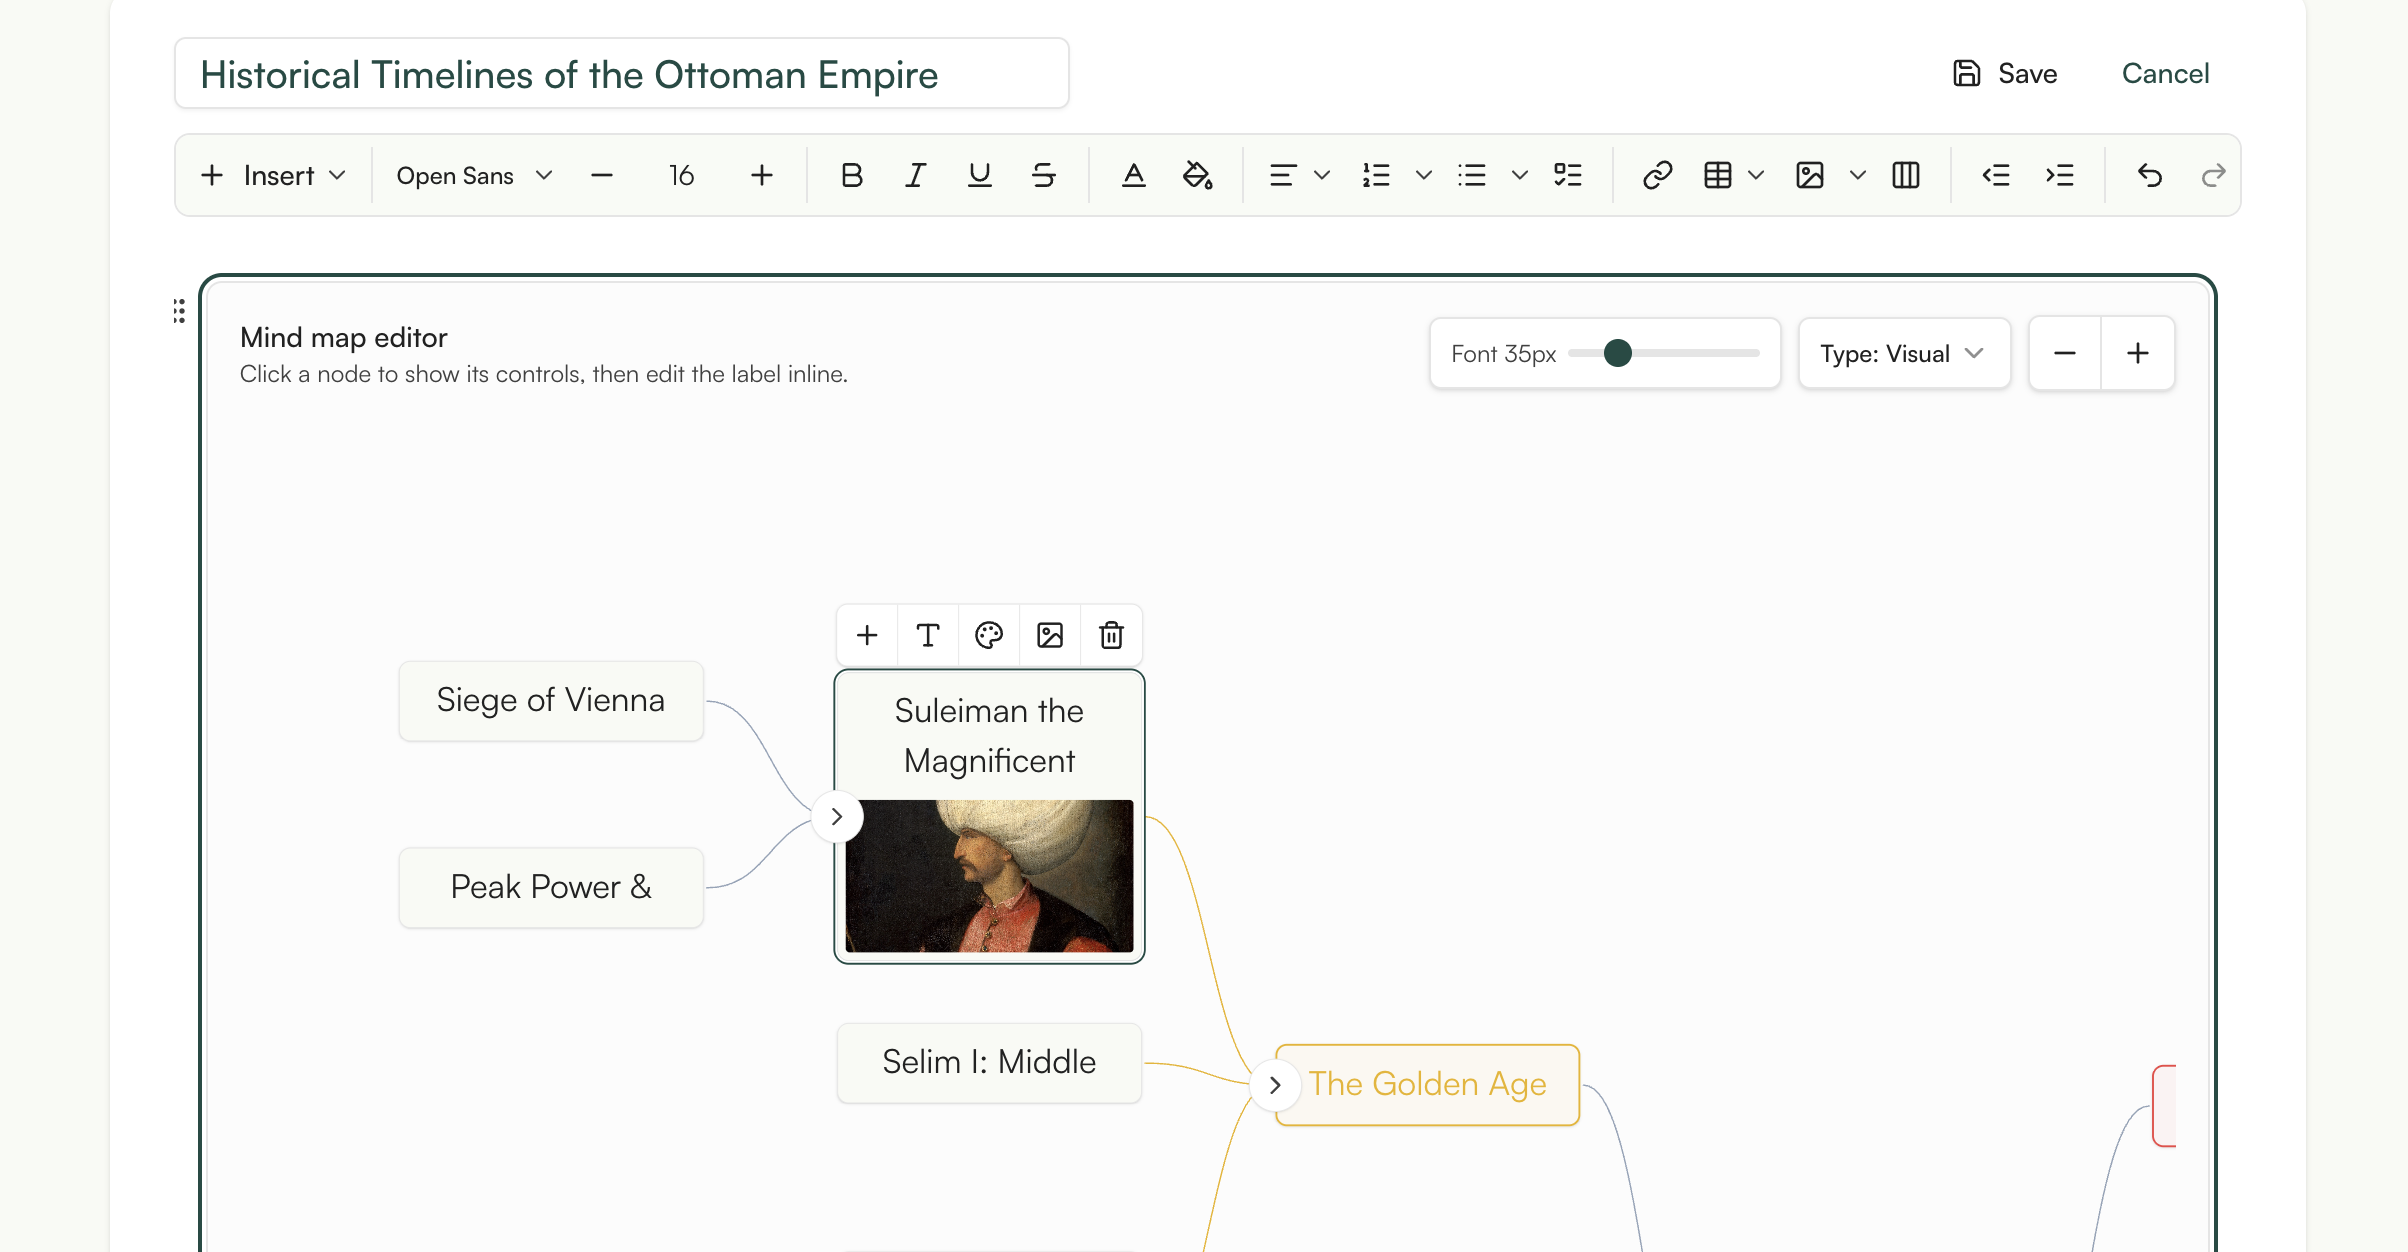
Click Generate. The page shows the map building with a percentage, and here is the honest part: it can take a few minutes, not seconds. You do not have to sit and watch it. Feel free to leave the page, and it will keep building. When it is done, the Visual map comes back with a central node, color-coded branches, short keyword labels, and concept images on the nodes where they help.
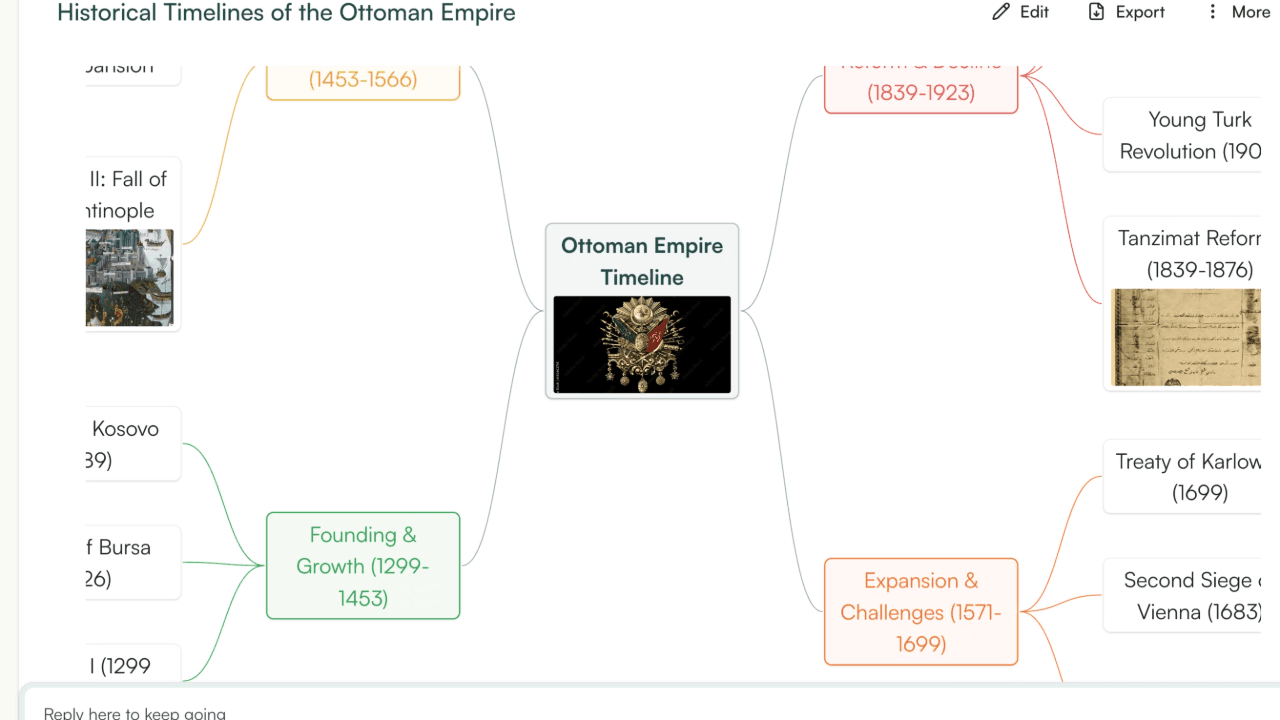
What you get back is a good first draft. It probably will not fit your class perfectly yet, and that is fine. The next step is adjusting it to your students.
Build your mind map right here – just fill this in and see what comes out.
The first map you get back is a draft. Open it up and you will usually spot something within a few seconds: a branch that runs one level too deep, or a node phrased for an adult instead of a ten-year-old. That is normal. The tool gives you a solid structure quickly, and shaping it to fit your actual students is the part that still needs you.
Under the finished map there is a chat box with Quick prompts. Each one fixes a specific version of "this isn't quite right yet":
You can also just type what you want into the chat, the way you would tell a student teacher what to change. And if a single node is the problem, click into it and edit the text directly instead of regenerating the whole map.
Here is the part that nags at a lot of teachers: if the AI built the map, am I still the one teaching? You are. The tool did the drawing and the first-pass organizing, the part that used to eat your evening. It does not know that your third-period class loses the thread the second a branch gets too dense, or that this unit always trips kids up on one particular connection. You know that. Deciding what to keep and what to cut is the teaching, and that is still your call.
So treat that first map the way you would treat a good first draft from a student. The structure is there, a few things need fixing, and ten minutes will make it yours. Hopefully by the second or third pass you have a map you would be glad to put in front of your class.
Once your map looks right, the last step is getting it in front of your students. There are three main ways to do that, and the one you will want depends on the type you picked earlier, Visual or Text-focused.
Here is how they line up:
All of the controls are at the top of the resource page. Edit lets you change the map, Export opens the list of file types, and Share gives you a link to send out. When you open Export, you will see options to download the map as PDF, PNG, JPG, or WEBP, and to send it to Google Docs, Microsoft Word, or Google Classroom.
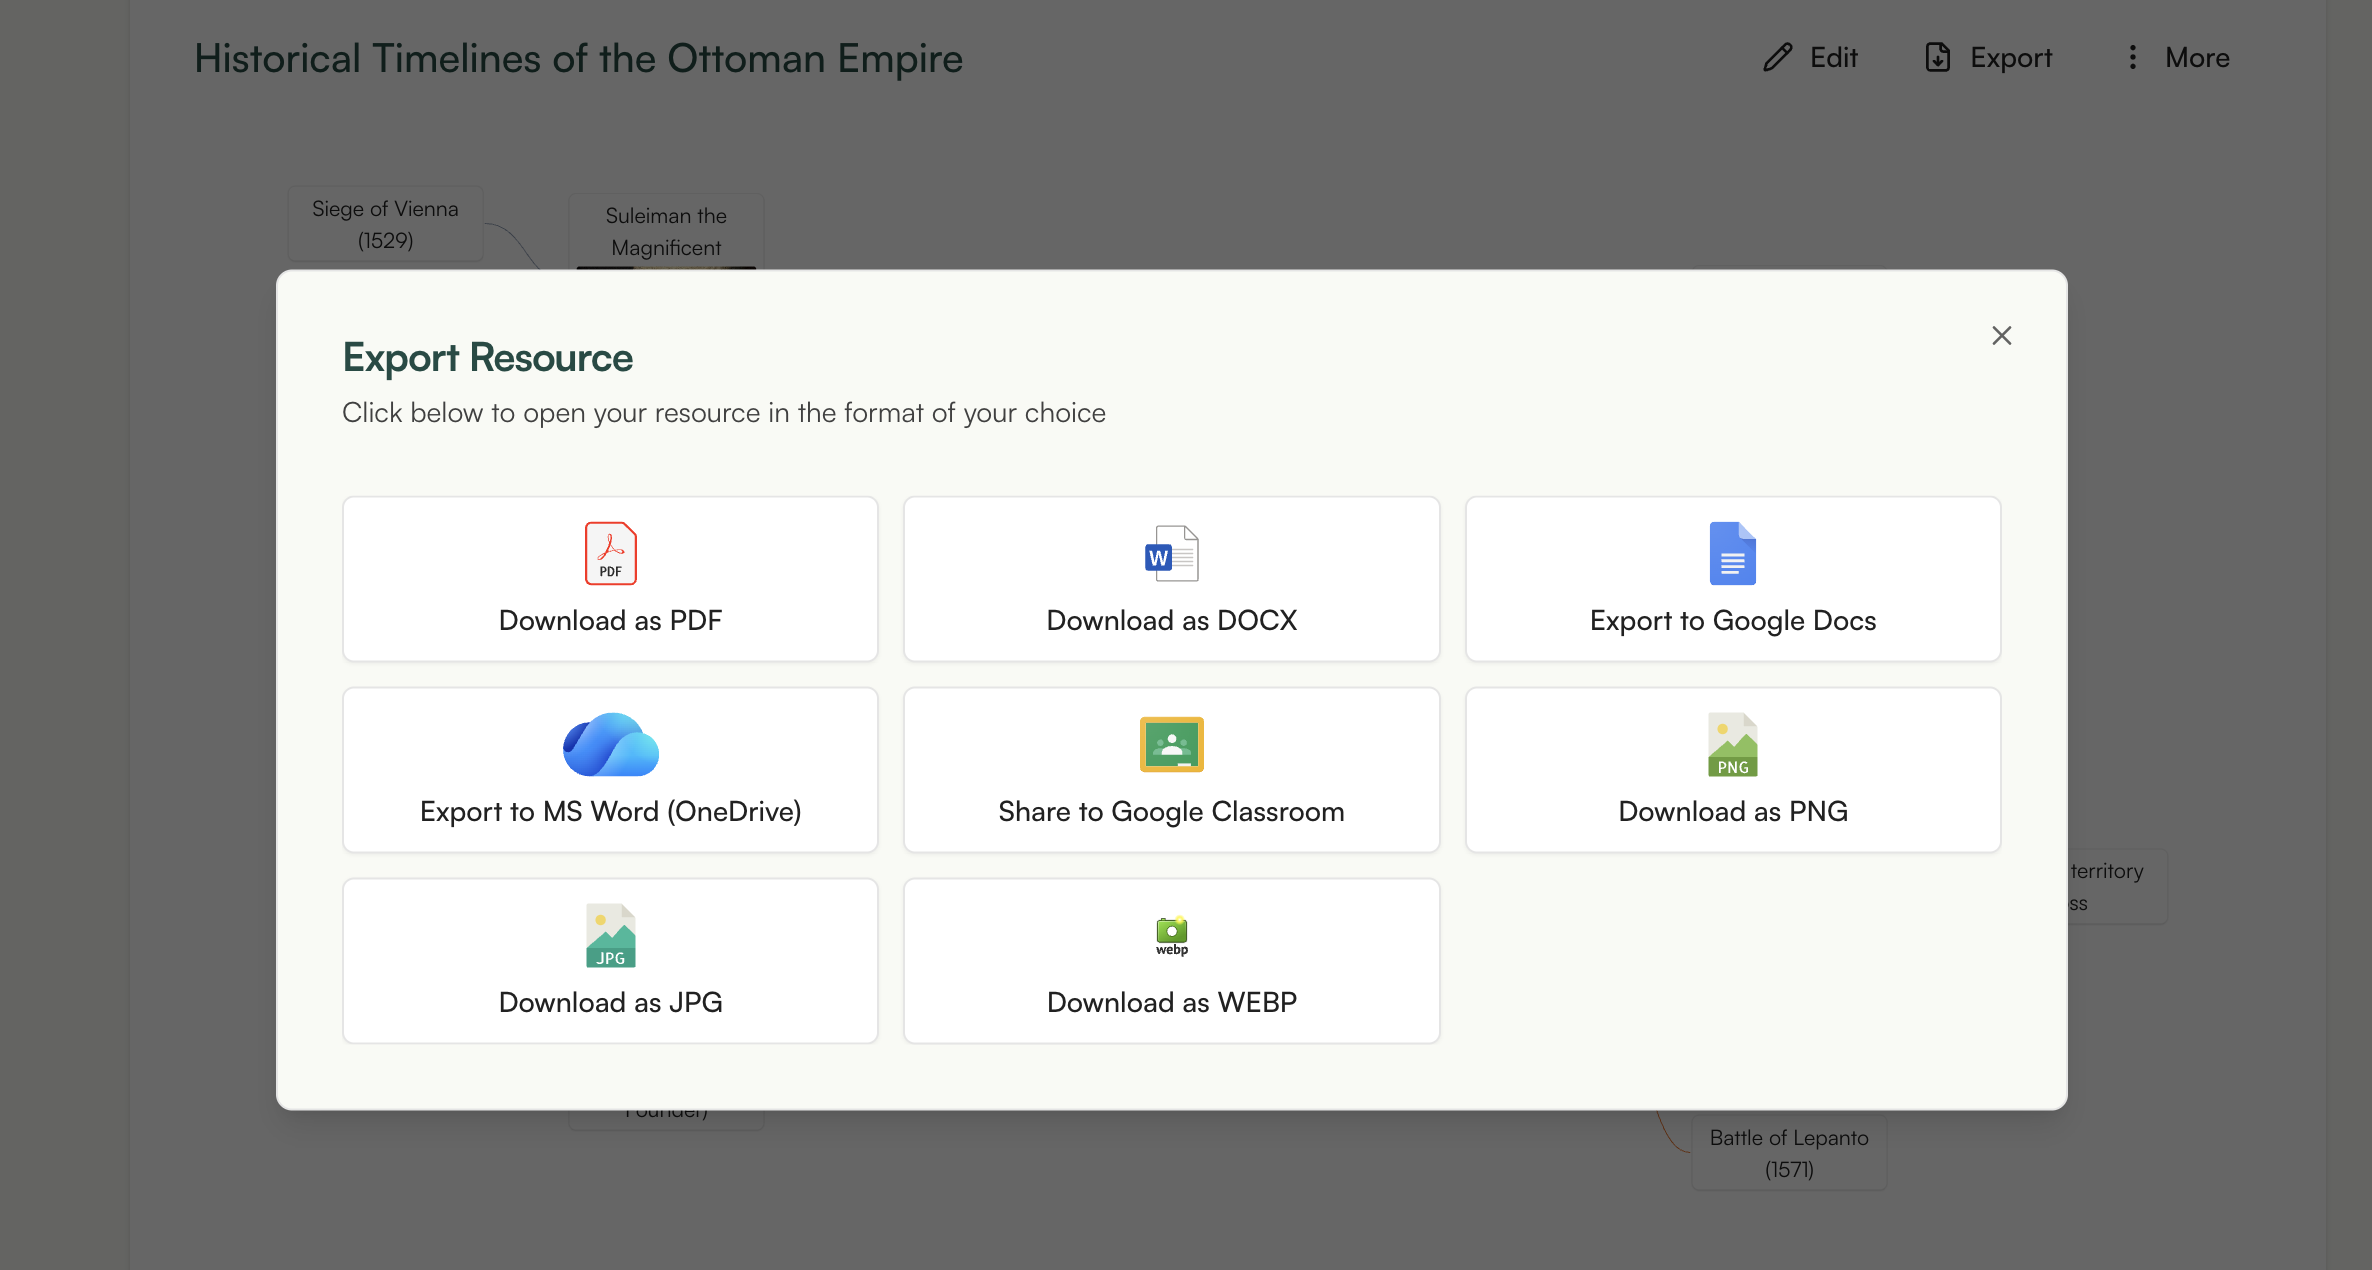
One thing to know before you export. The map saves as an image, not an editable file. The text will not be selectable, and if you zoom in very close on a projector it can look a little fuzzy. So think of the export as a picture of your map. If you need to fix something, make the change in Monsha first, and then export it again.
If you are handing the map out, you can use the old trick of leaving a few branches blank for students to fill in as you go. Export a Text-focused map as a PDF for that, or build the fill-in copy with the Handout tool. Either way, the printed version will match what you saw on the screen.
That is the one-step route from start to finish. So before you choose, it is worth seeing what a regular chatbot does and does not give you.
You can do this with a regular chatbot too. ChatGPT and Claude will both build you a mind map, and for a quick brainstorm on your own, that might be all you need.
You ask for it about the same way you would describe it to Monsha. I asked Claude for the photosynthesis map from earlier, like this:
Make a mind map for a Grade 7 science class on photosynthesis. Put the central topic in the middle, main branches for the key ideas, and a few sub-points under each. Keep each node to a keyword or short phrase.
Here's what it gave back:
# Photosynthesis
## What it is
- Plants making their own food
- Light energy turned into chemical energy
## What it needs
- Sunlight
- Water (from the roots)
- Carbon dioxide (from the air)
- Chlorophyll
## Where it happens
- In the leaves
- Inside chloroplasts
## What it makes
- Glucose (the plant's food)
- Oxygen (released into the air)
## Why it matters
- Feeds the plant
- Makes the oxygen we breathe
Now, that's a perfectly good outline. The branches make sense, the wording is about right for Grade 7, and if you just wanted to get your own thinking straight before planning the unit, you can stop right here.
But take a look at what you actually have. It's a list in a chat window. You can't project that, and it isn't a handout. To turn it into a real map, you copy the text into a separate tool that draws it for you, something like markmap or another mind map app, and then you've got your picture. That's a few more clicks for something you figured you'd already finished.
So here's the trade. ChatGPT and Claude are good at the thinking, and then they hand the drawing back to you. For a quick private brainstorm, that's fine. For something going in front of your students, you're back to building it yourself.

Most of the time the question answers itself: if the map is just for you, a chatbot is fine; if it's going in front of your students, you'll want the finished version.
A chatbot like ChatGPT or Claude is quick and good at the thinking. For a private brainstorm before you plan a unit, that outline is the whole job, and you're done. But the moment the map has to go on the board or into a student's hands, an outline isn't enough. You still have to turn it into a picture, and that's a second task on a day you probably don't have a spare ten minutes for.
The one-step route skips that second task. You get a finished, editable map you can export and hand out, instead of a draft you rebuild somewhere else.
Side by side, the two routes look like this:
So in my opinion the tiebreaker is time. If it's going to your students and you're already short on the week, the last thing you want is a second job turning an outline into a picture. For that, the route that ends with a real map is the one worth your time.
Creating a mind map with AI used to be the slow part. Now it isn't: decide what the map is for and what grade it's pitched at, and the tool draws it in a few minutes.
Feel free to open the Mind Map tool and make one for your next lesson. Hopefully it saves you an evening.


AI for Teachers
We’re the Monsha Team—a group of educators, engineers, and designers building tools to help teachers combat burnout and get back to life.. Our blogs reflect real classroom needs, drawn from conversations with educators around the world and our own journey building Monsha.
Join thousands of educators who use Monsha to plan courses, design units, build lessons, and create classroom-ready materials faster. Monsha brings AI-powered curriculum planning and resource creation into a simple workflow for teachers and schools.
Get started for free